It is a sad statement of fact that no matter how much gear we own, in the days leading up to the departure for a major trip we manage to identify something that we absolutely, positively must have before we fly. This time was no different. It’s May of 2022 and the world is emerging just a bit from its COVID hibernation, though infection counts are again rising in the US. We are preparing for our first foreign vacation in over two years, a long anticipated trip to Dominica with the hope of getting in the water with sperm whales. In this case the gear to be purchased, less than two weeks before our scheduled departure date, was a new wide angle lens for use in the DSLR underwater housing.
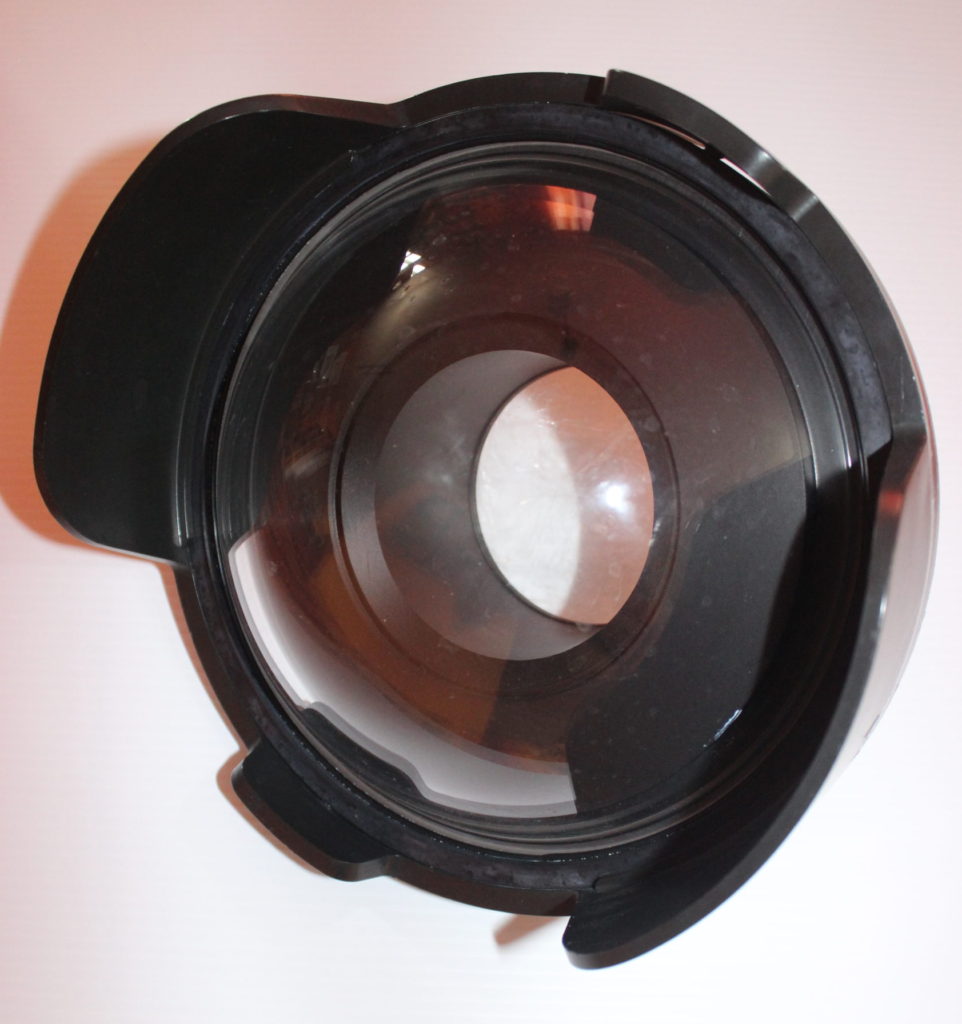
In case you’re not familiar with underwater housings for DSLR cameras, they are fundamentally a waterproof box with a so-called dome port on one side. In our case the dome port looks like a large, clear fish eye set onto a black plate with a hole in it. Into the hole, on the side facing away from the fish eye, is screwed a large diameter tube, the dome port “extender”, which then mates with the box. The camera is placed in the box and is screwed onto the bottom of the box and the lens protrudes through the tube and into the dome port. Water is kept out of the box with O-rings treated with silicone grease made specifically for that purpose.
Our housing, made by Ikelite, is on the inexpensive side as far as DSLR housings go. But even so, it’s a minor marvel of construction and mechanical ingenuity. The box is made of thick, clear, cast acrylic. The back side of the box detaches and affixed to the inside face is a small shelf onto which the camera attaches. This detachable side attaches to the rest of the box with three beefy metal cams, compressing a large O-ring running along the perimeter to form a watertight seal.
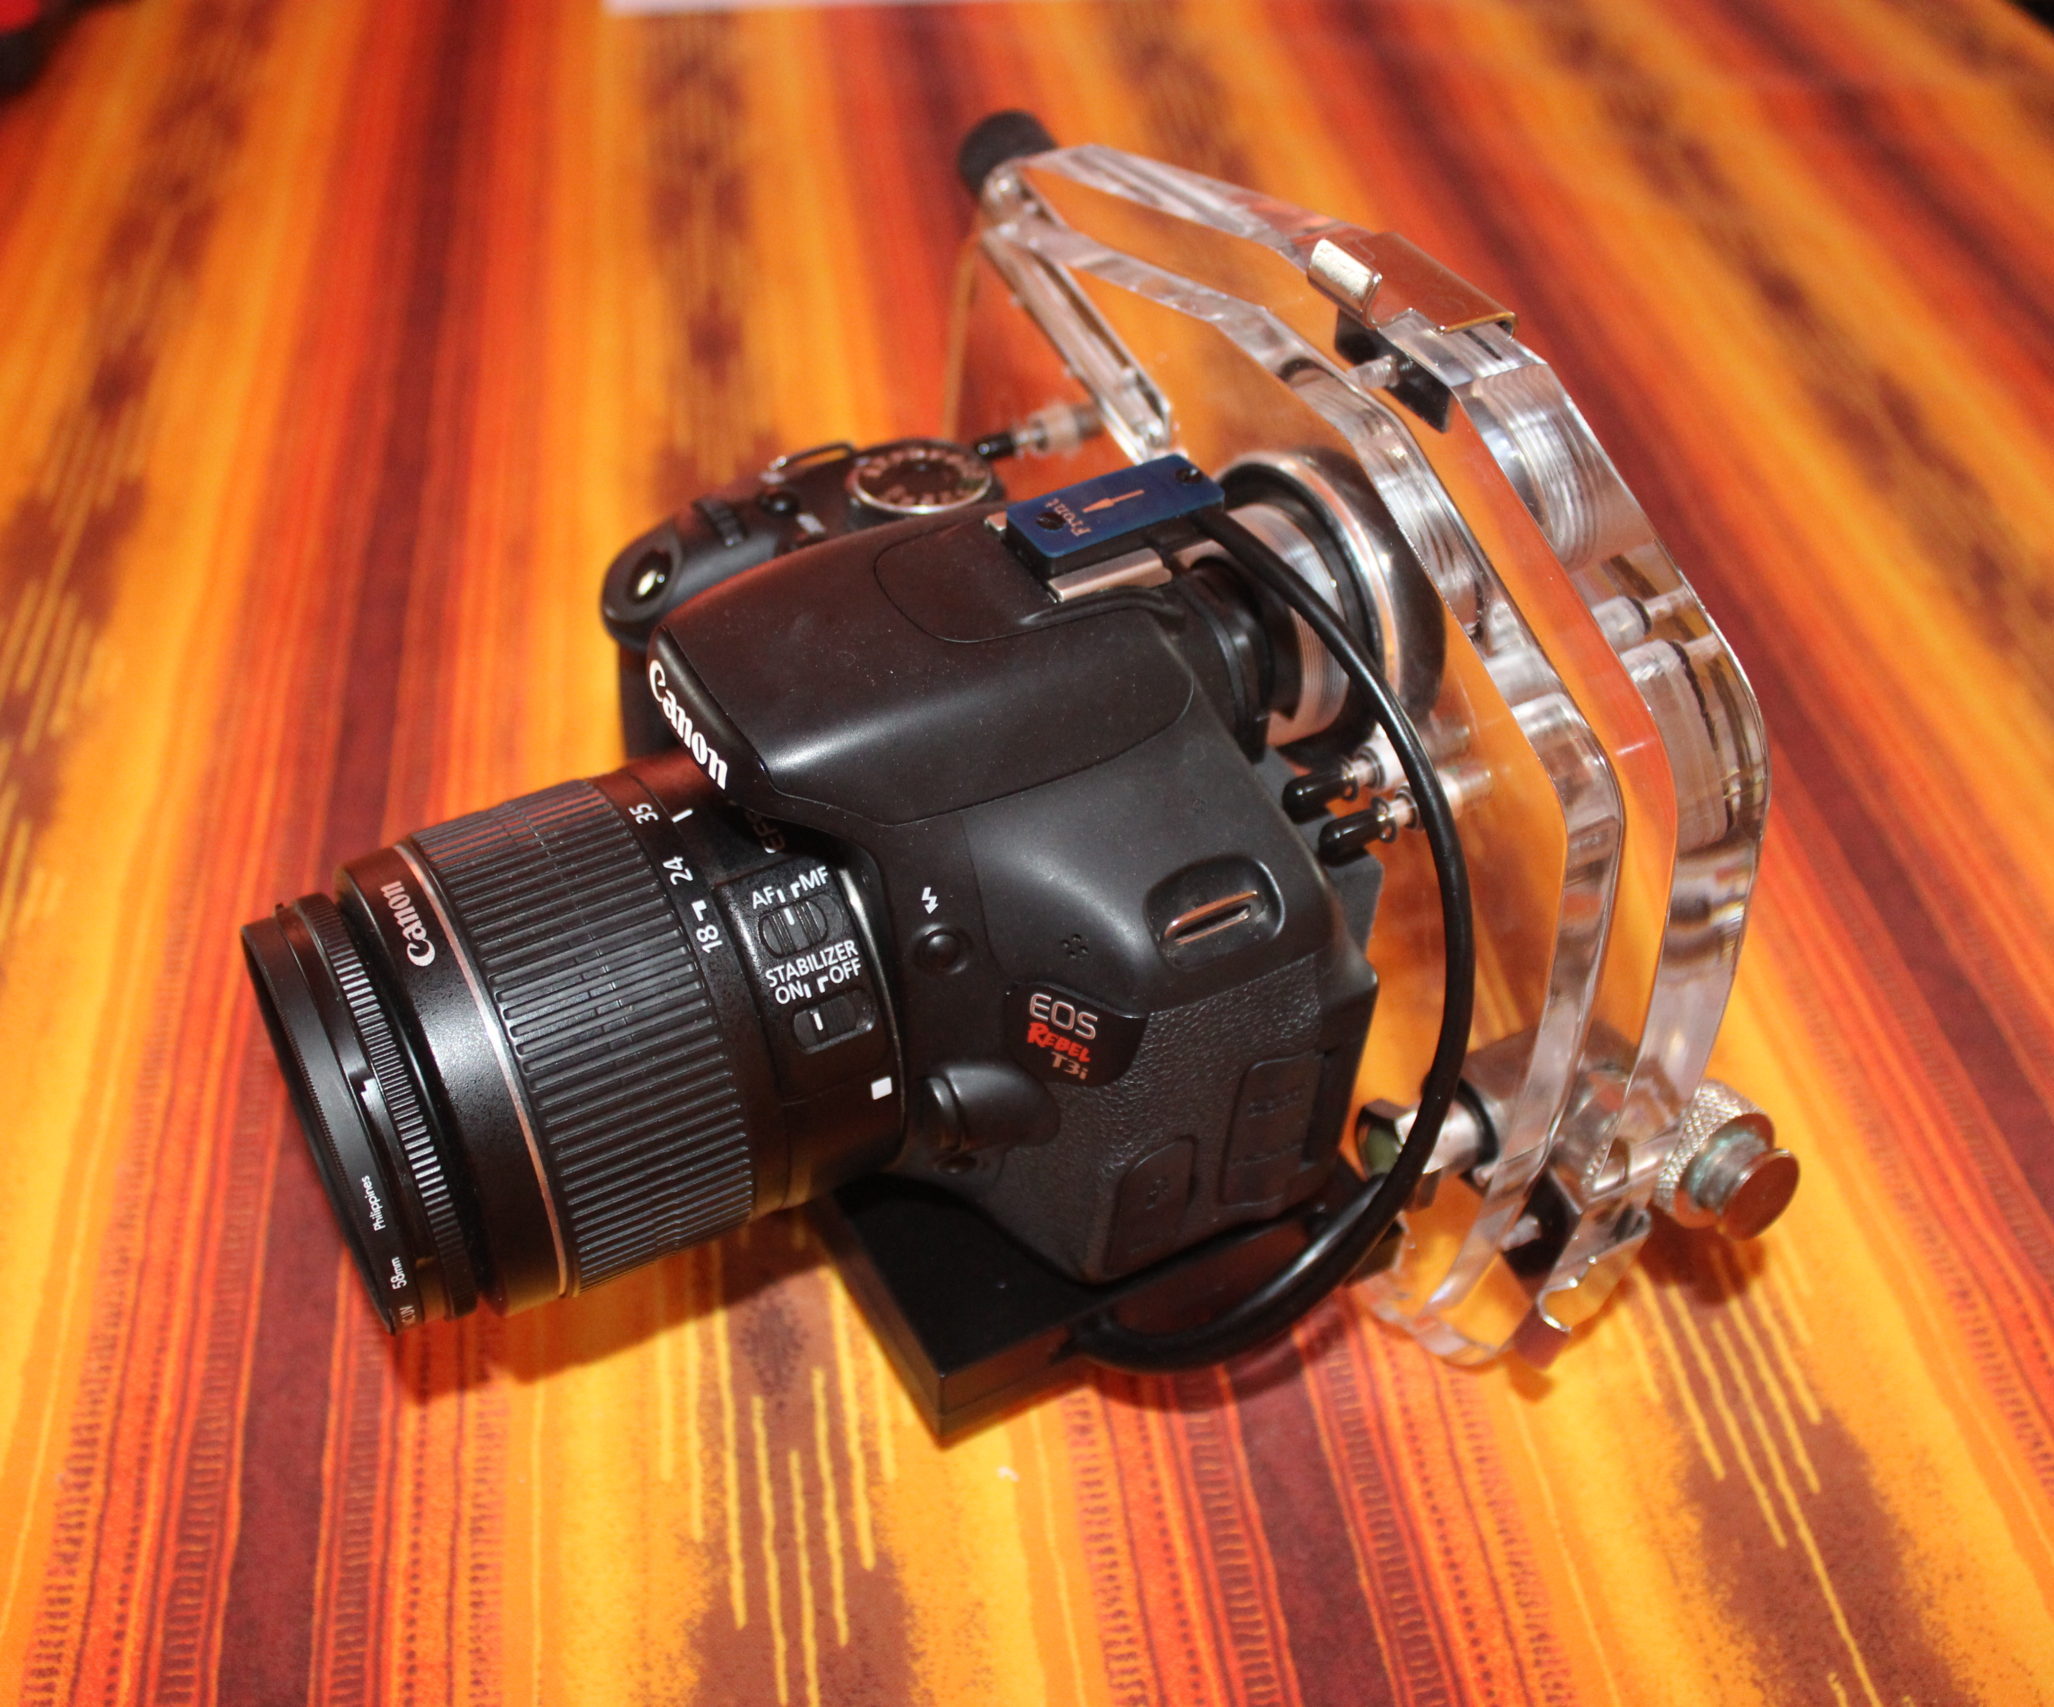
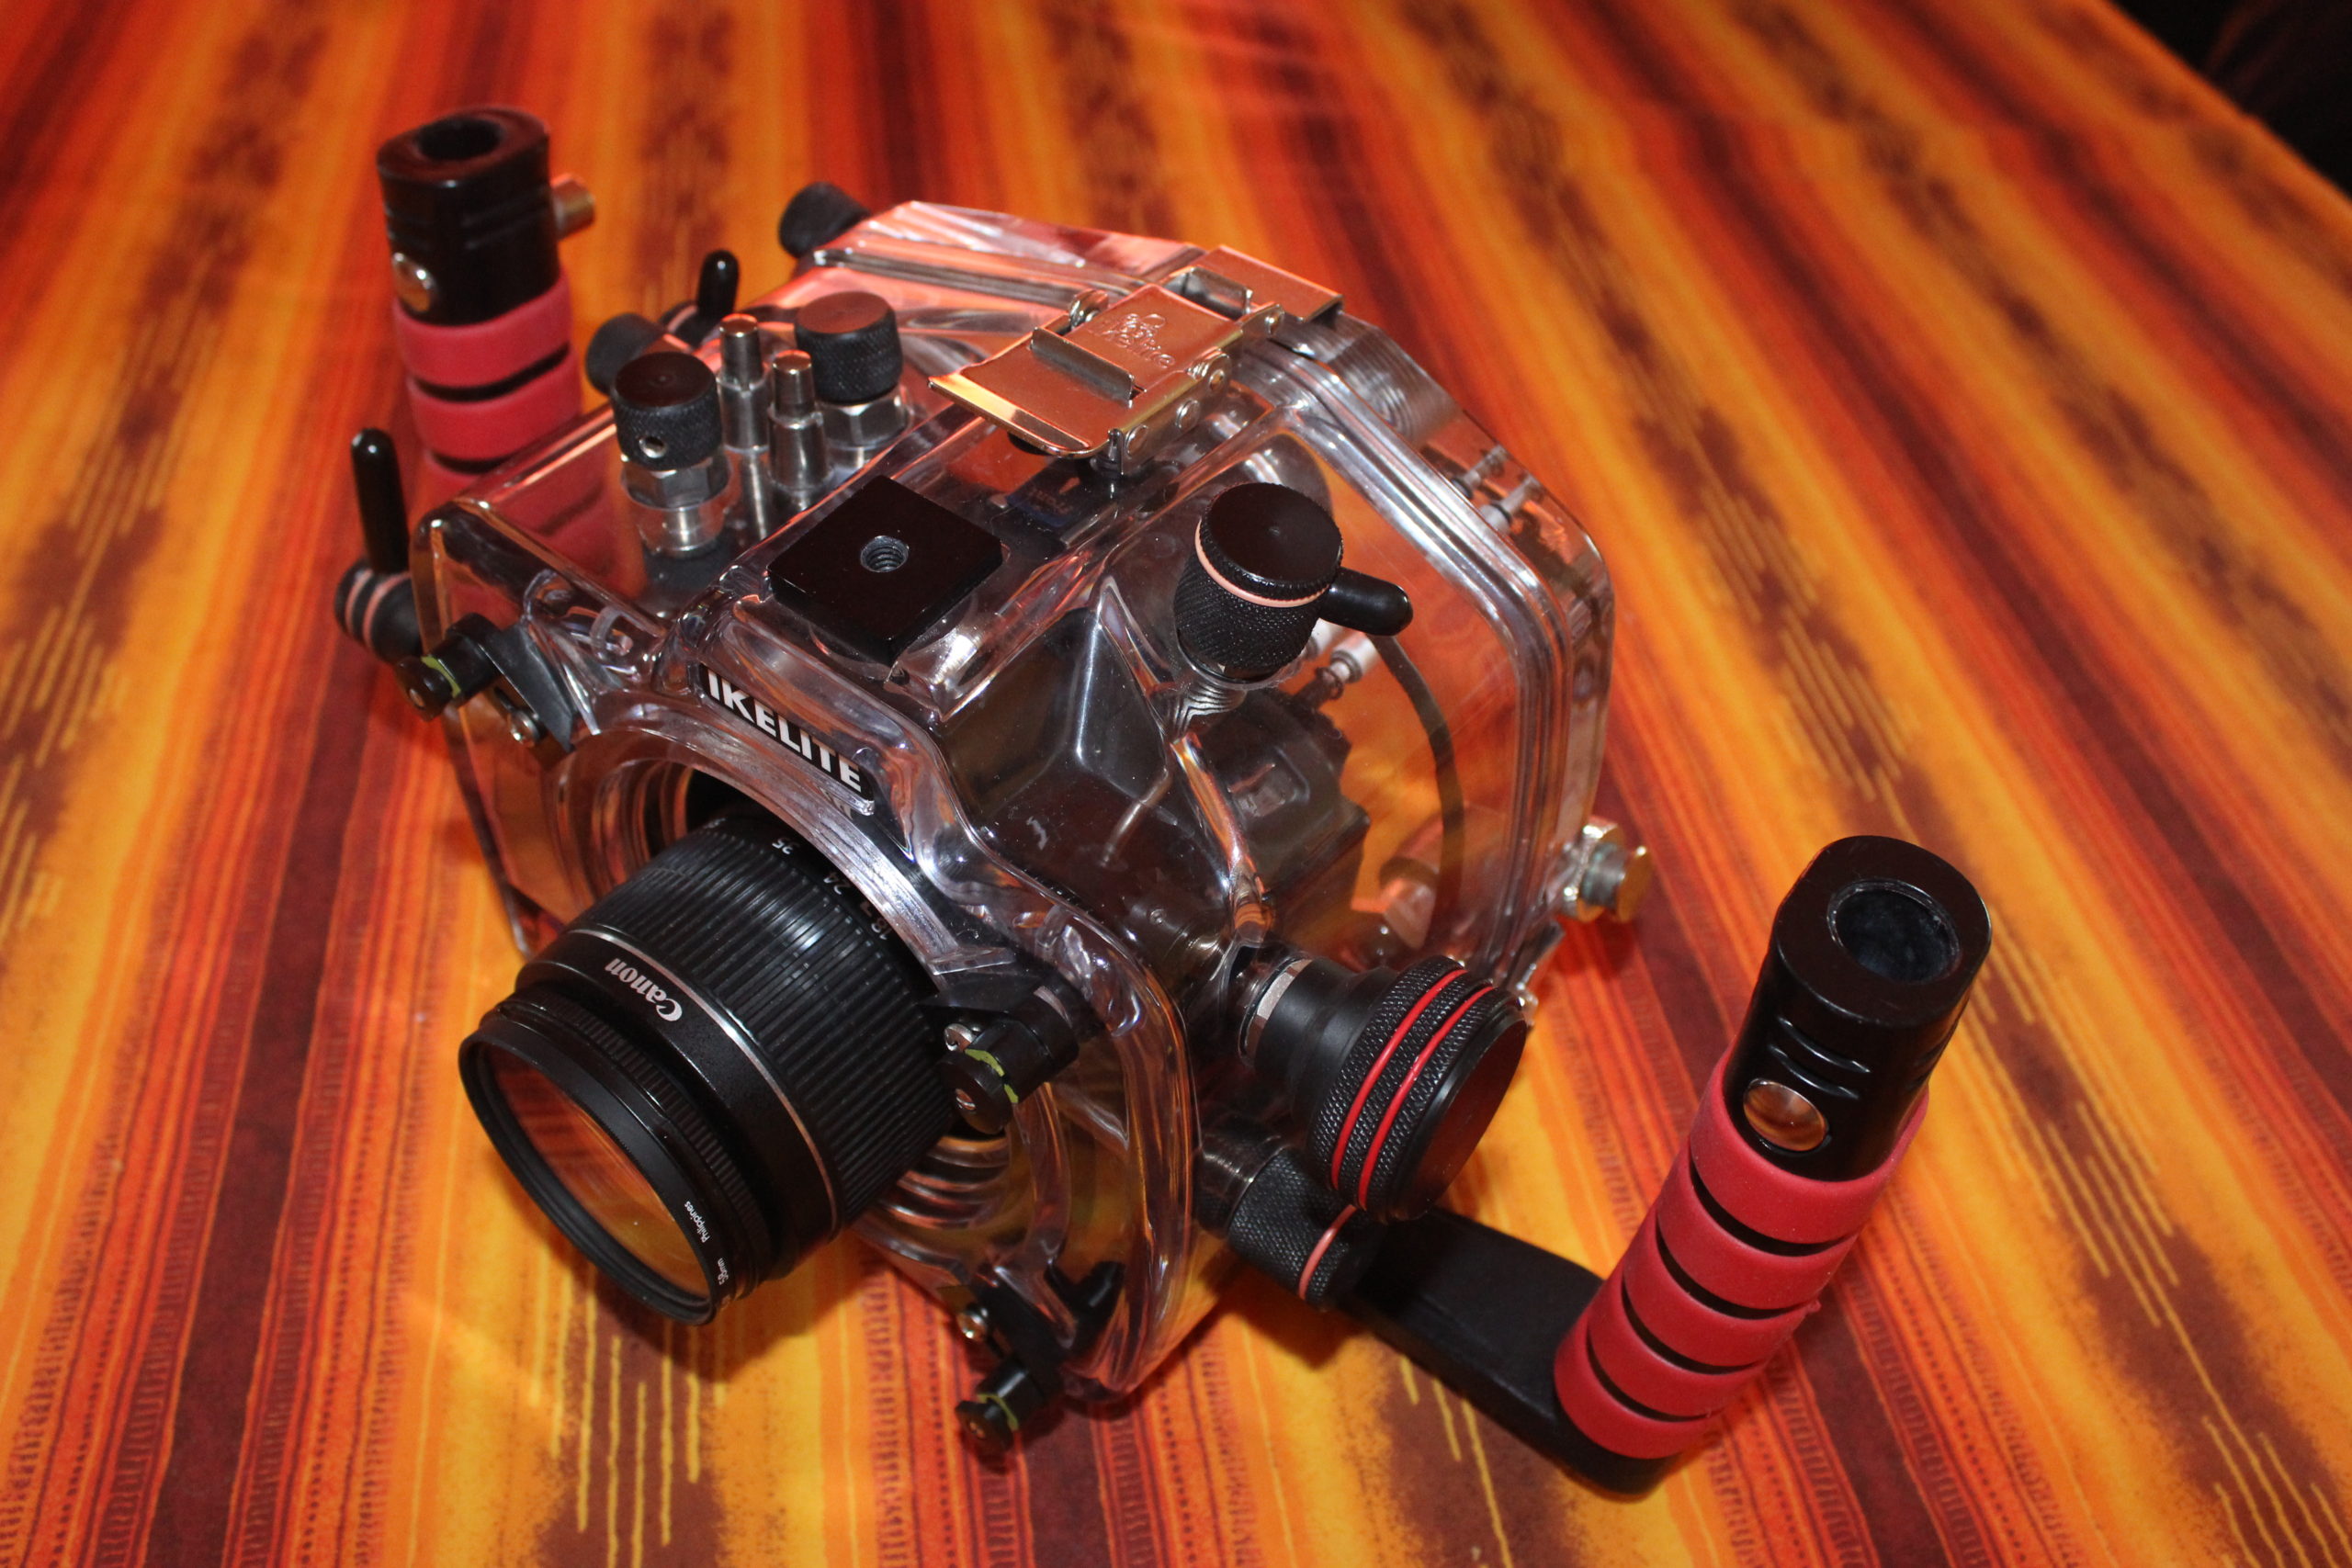
Buttons and knobs on the outside of the housing control levers, gears and tiny batons on the inside so that nearly every button, knob and wheel on the camera body can be manipulated. This housing is made specifically for our camera; differences in control placements on the camera body would render the levers, gears and tiny batons useless.
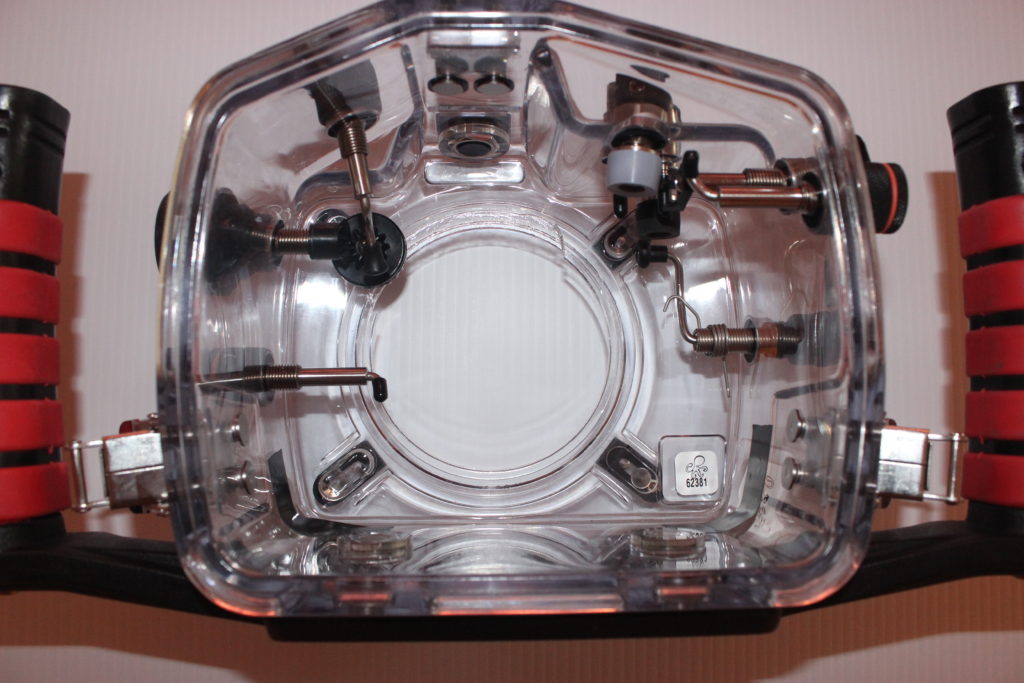
The important knob in this story is on the side of the box and is used to adjust a zoom lens, should you be using one. Turning the knob moves a couple of gears fixed to the inside of the box. These gears are made to engage the gear teeth around the base of a two inch tall, rigid, removable plastic sleeve that slides over the lens. This sleeve must grab the lens so that when the sleeve turns, the lens zoom setting changes. The more ideal mechanism we’re trying to approximate here is a large gear bored out to the diameter of the lens and glued in place on the camera‑body‑side of the lens.
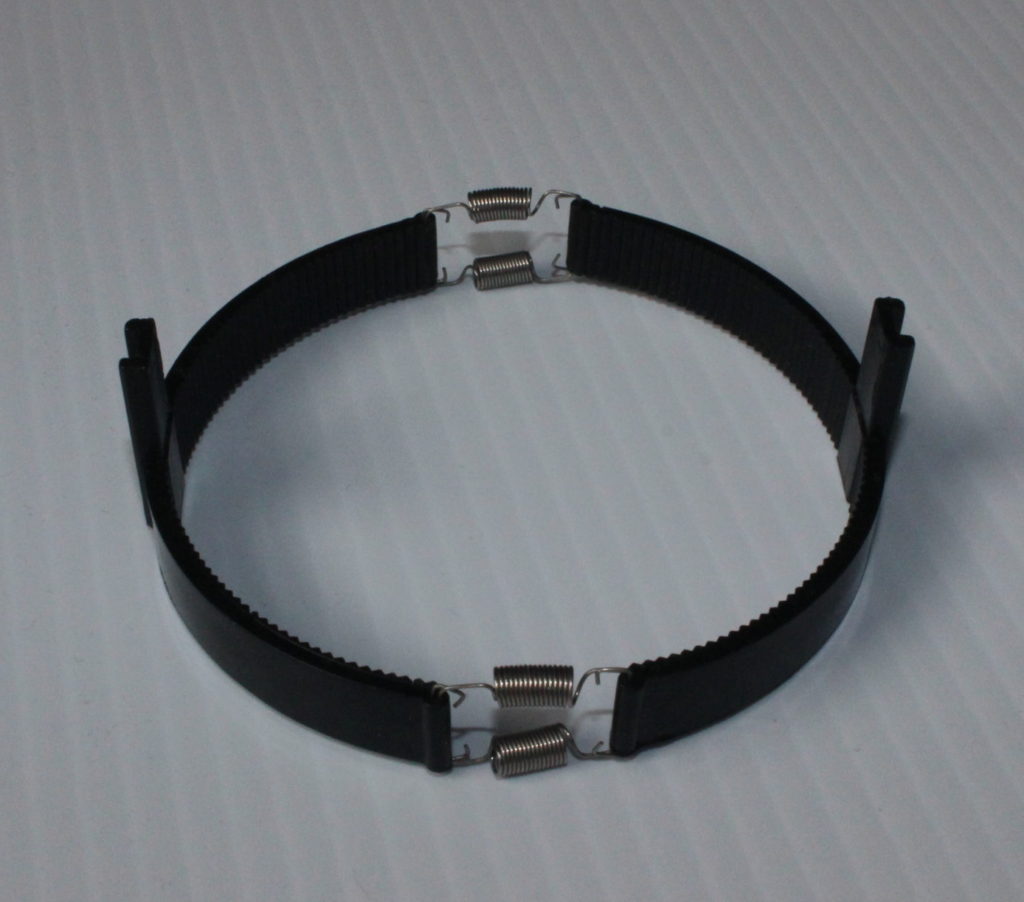
In order for Ikelite to avoid making a plastic sleeve specific to the diameter of every zoom lens body from every zoom lens manufacturer, they instead make the aforementioned plastic sleeve that fits, with ample clearance, over most lenses and then provide you with an adjustable ring made of two rigid, plastic, curved segments attached to each other with a pair of metal springs. This adjustable “segmented belt” slides onto the lens and grips it tightly. On opposite sides of this segmented belt, cast into the middle of each plastic segment, are two small grooves that run the direction of the lens axis and mate with two thin tongues on the inside of the sleeve. It’s a clunky assembly, but in most cases it works.
Sadly, one of those cases was not our case.
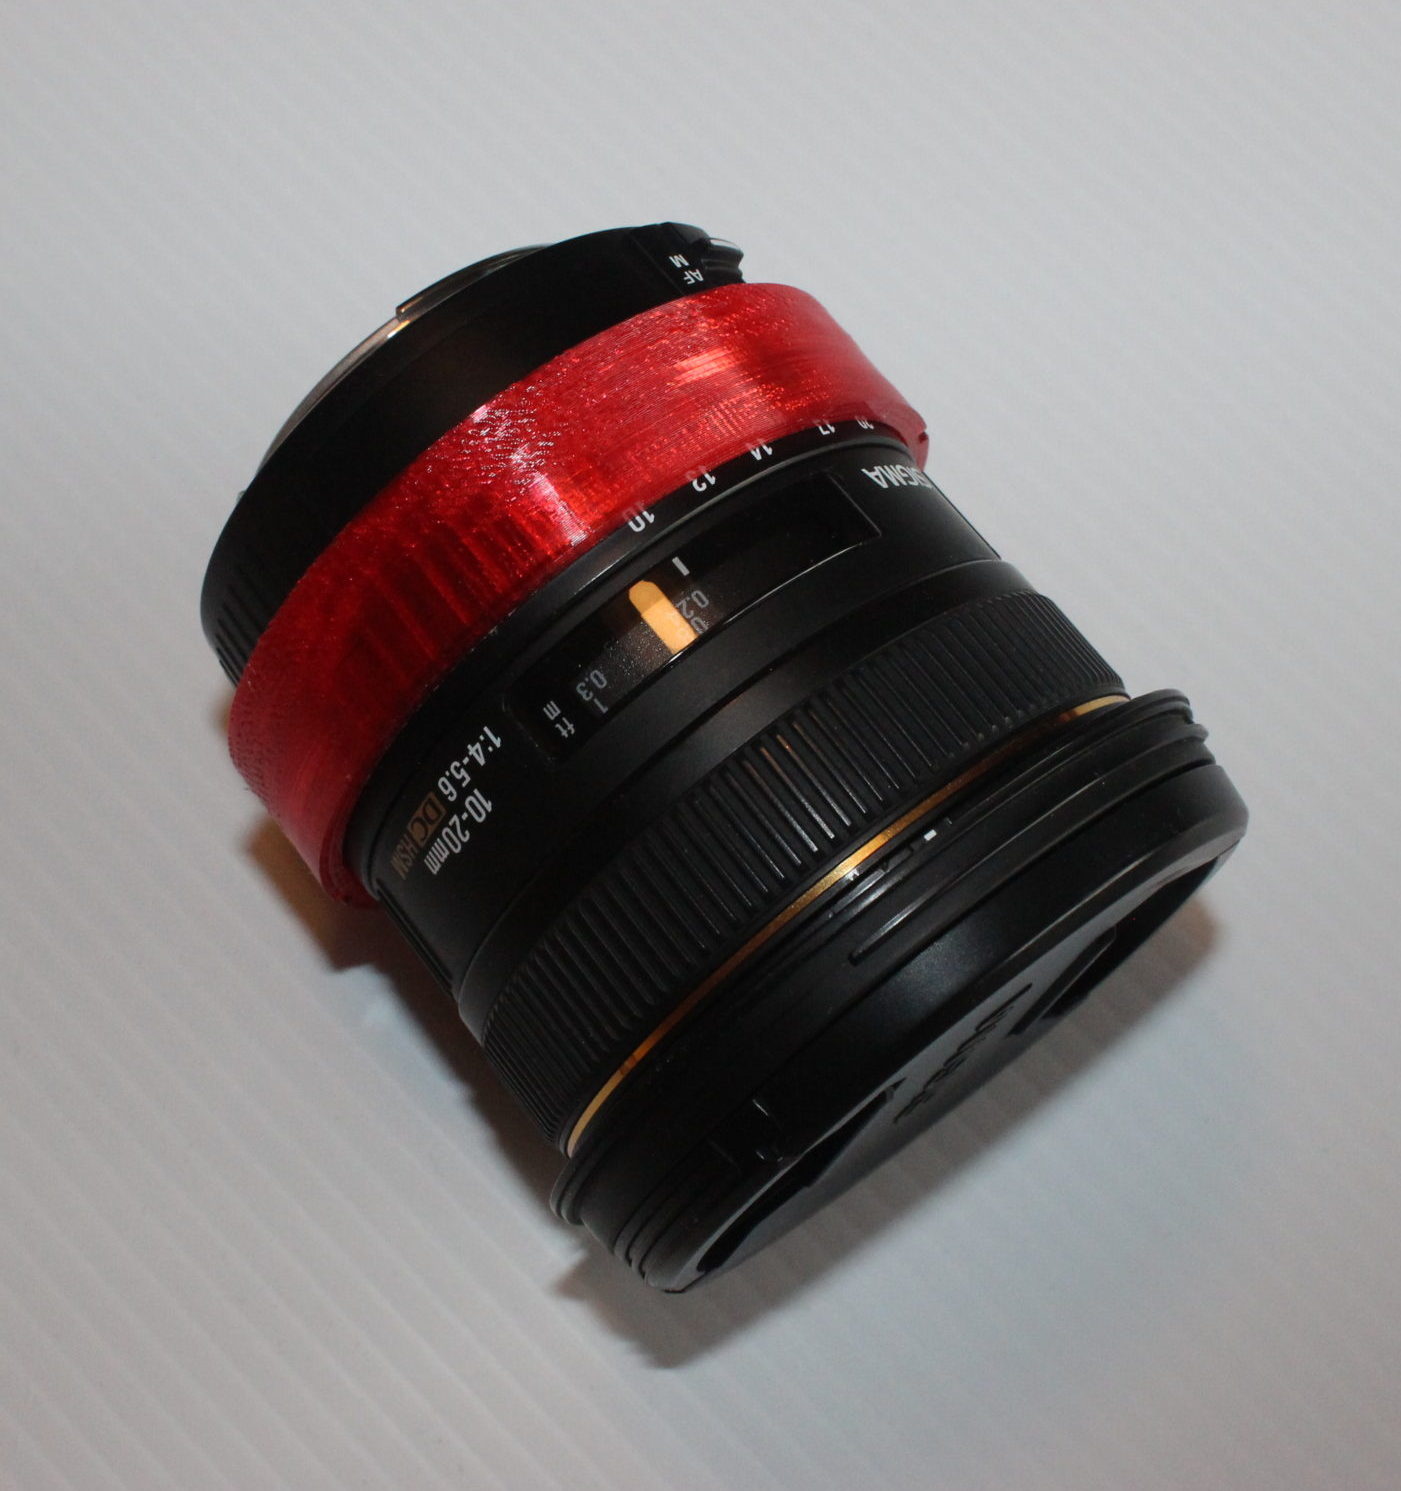
Three days before departure we were finally in possession all of the necessary parts, ordered from different online vendors. There was the new Sigma zoom lens of course, a new dome port extender and a new plastic sleeve, since our old one would only fit smaller diameter lenses. The extender threaded into the dome port perfectly and was the right length to allow the zoom lens to protrude into the dome port without hitting the interior surface of the ‘fish eye’.
It was here that things got interesting. And I don’t mean interesting in the “Did you know that an irritated sperm whale whips its liquified feces into an effective aquatic smoke screen for escape” sense. No. I mean interesting in the “Damn-it-what-are-we-going-to-do-now?” sense. The segmented belt that we’d been using for years on our other lens felt really tight on the new lens. Tight the point of me wondering if I was permanently deforming those little springs. Furthermore it wouldn’t slide down over the lens far enough for the plastic sleeve to both mate properly with the grooves and to engage the gears inside the box.
After a bit of confusion we (re)discovered that we were already in possession of a second, larger segmented belt which came with the housing. But while it fit more comfortably on the lens, it too could not slide down far enough to properly mate with the sleeve.
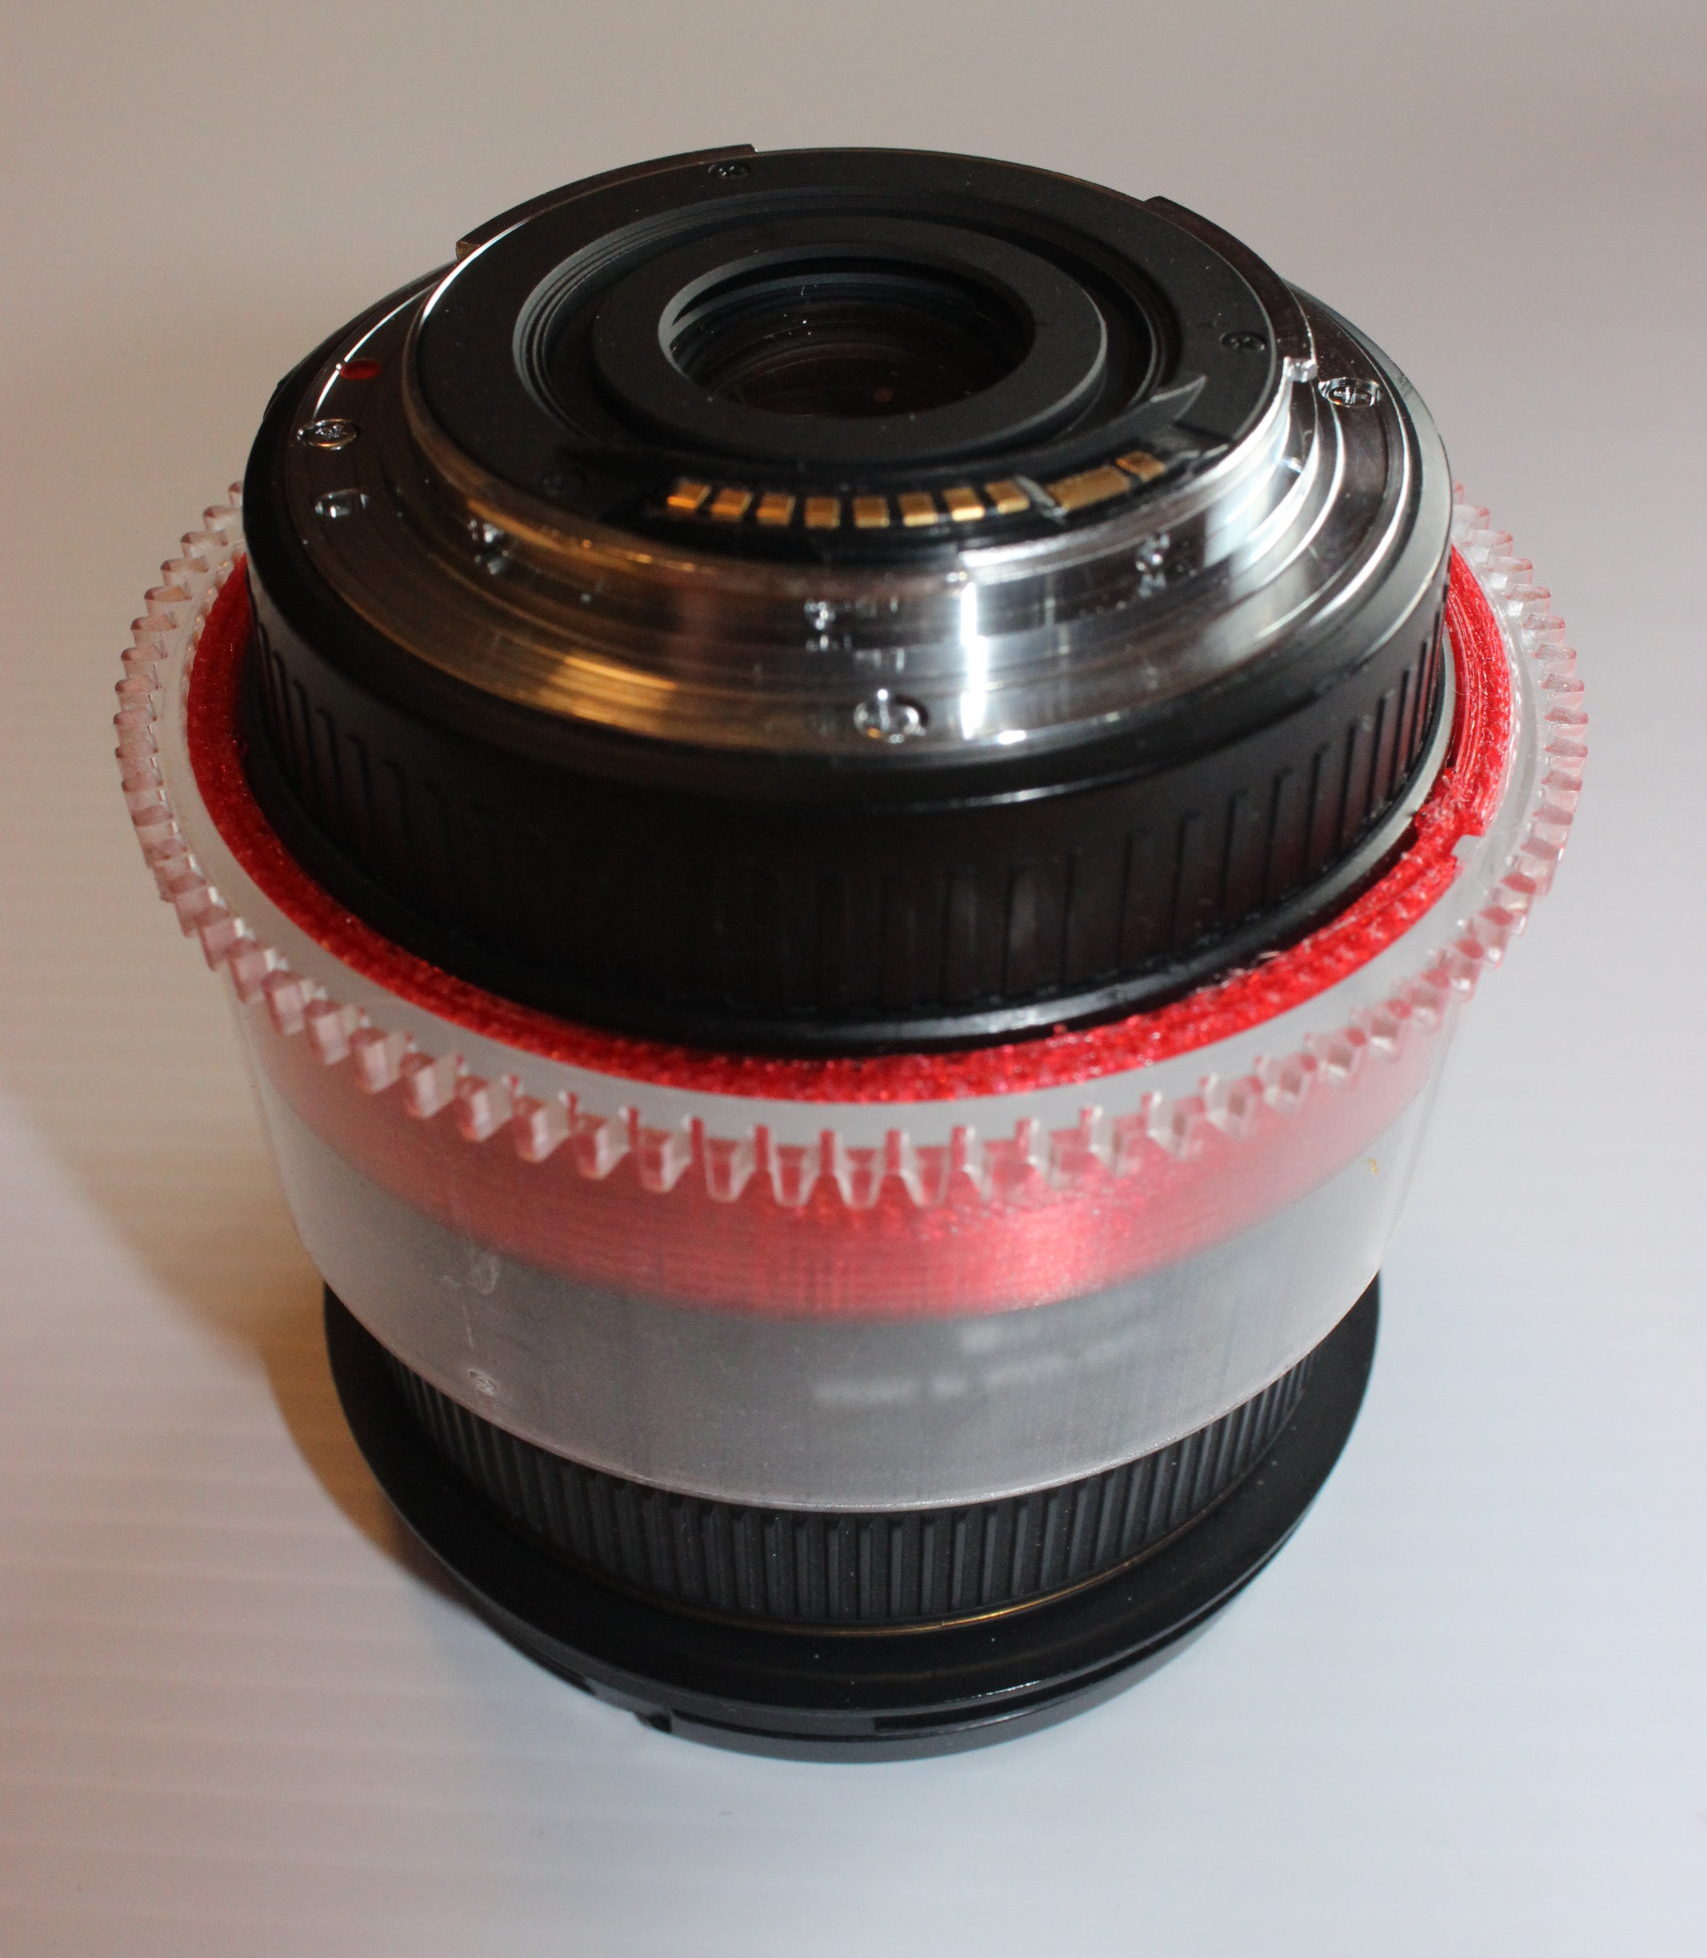
What to do? It was far too late to research and order different parts, if such parts even existed. Barbara was just resigning herself to not being able to zoom her new wide angle once it was locked up inside the housing when I began to wonder if I could design and fabricate an alternative. All that would be required was a sort of rubber band which fits snugly onto the base of the lens and into the outside of which are carved two grooves, 180 degrees apart, to accomodate the sleeve’s tongues.
From a CAD design perspective, it was a very simple part. The trick would be in fabricating something that fit snugly, ideally a little bit compliant, like a rubber band. My spool of TPU filament came to mind.
TPU is flexible but really strong and durable and I have spent quite a bit of time learning to print with TPU filament. The filament path through the printer’s extruder must be more constrained than when printing with say PETG or PLA, otherwise one risks the filament “escaping” as it’s being pushed into the nozzle. I have made some minor modifications to my direct drive extruder to avoid the heartache that accompanies escaped filament. In this project my only concern was being able to print those two grooves with enough resolution to be effective. There was nothing for it but to try.
The next morning before breakfast I measured everything and designed the band in FreeCAD. After breakfast, but before I started my day in the home office (it’s still COVID season) I fired up the printer, loaded my spool of candy apple red TPU, and printed the first prototype. It completed in about an hour and while it slid onto the lens and gripped it really well, it was too thick for the plastic sleeve to slide over it. But perhaps the more important discovery was that the grooves on the outside of the band rendered perfectly and I could tell that they would have no trouble mating with the tongues inside the sleeve.
I tweaked the dimensions in the CAD model and reprinted. Except that I botched that print, printing a second copy of the first prototype. But three’s the charm and the third attempt resulted in a band that fit perfectly onto the lens.
I assembled the lens with the printed band and plastic sleeve. With the camera body mounted and enclosed in the housing and the dome port removed, I fitted the lens into the camera body and pushed the sleeve into place. With just a little fiddling, the teeth on the sleeve engaged the gears in the housing. I turned that Important Knob and watched the lens zoom in and out. The whole thing worked brilliantly and without a doubt better than the segmented ring provided by the manufacturer.
The whole assembly worked perfectly for our week with the sperm whales and Barbara used it to capture some really wonderful images.